Thought for the Day

Thought for the Day-
August 19, 2020
Uncontrollable events in our lives often come without warning. We don’t get a notice in the mail or a reminder on our phone. How we handle such situations depends impart on the magnitude of the uncertainty as well as our faith, character and personality. When the unexpected arrives, we need to remember that nothing takes our God by surprise. Possessing a patient spirit, know that our heavenly Father is victorious at all times, will help us to “let go and let God”.
Have a blessed day!
Cathy

Monday, July 29, 2013

Collage Art


As I have mentioned before, I am not the best blogger. I just LOVE to create art, but documenting my work is not top priority.  When I decide to tackle a new project, I like to just "jump in" and "loose" myself. 

This project was no different. 

An artist friend of mine recently attended a workshop where she learned how to do a type of collage painting which I had never seen. I got excited about the prospect of making my own mixed media artwork after witnessing her masterpiece. Since I lost the picture I took of her work (I lost all of my pictures, phone numbers etc. on my phone do to failure to “update”-valuable lesson learned), I only had written instructions from which to work.

Hopefully my partial "how-to”, which follows, will give you a pretty good idea of how to complete this project.


There are a few layers involved, but it’s actually quite a simple

to do.


Supplies needed:

-a large canvas (I used an 11x13)
-various bits of printed paper such a scrapbook paper, sheet music, dictionary pages etc.,
  torn into small pieces
-small piece of fabric, large enough to cover bottom portion of canvas
-glue (I used Mod Podge Gloss-Lustre, which worked great)
-acrylic paints
-paint samples (free from hardware store) to spread paint with instead of using s brush
-black oil pastel crayon
-stamps and/or stencils to create “texture” to background and add a possible quote           
-sponge brush


Step 1:

Glue bits of paper to canvas in a collage fashion, covering most of the surface. Glue fabric piece on bottom section of canvas.  Let dry.

Step 2:

Take your black oil pastel crayon, and draw a simple figure, such as an animal, on dried surface. 


Step 3:

Using a paint sample as your “brush”, paint everywhere except the inside of your image. By using this technique you avoid having brush marks and you can apply the paint in a thicker manner. Do NOT cover your oil pastel lines-this will give more “character” to your finished work. Let background dry.


Step 4:

Stamp or  stencil on top of first layer of paint, using a lighter shade of paint than your background, to give “depth”. Let dry.


Step 5: (optional)

 Stamp words, sayings or quotes on background.


Step 6:


Apply a top coat of Mod Podge over entire surface of work.  I don’t like a shiny surface, so I took a rag and blotted off some of the glue as I worked.  


After I finished my collaged piece, I added a “safety” eye (used for  making stuffed animals) to my chicken.  Scroll back up to the top to see completed project.

I hope you have as much fun as I did doing this whimsical piece.  I can’t wait to work on another one!


Sunday, July 28, 2013

Dragonfly Door Hanger

  I have taken a fancy to making these easy burlap door hangers.  So far, I have made an owl for the fall and a heart for Valentine’s Day.   I wanted one for the summer, but did not see anything out there that “caught my eye”. Dragonflies seem to scream summertime to me, so I started looking for door hangers that others had done.  When I found none that I liked,  I decided to Google some images.  Between pictures of dragonflies from nature and various other pics, I drew up my own rendition.   I think he turned out pretty cute!


Thursday, July 4, 2013

Glory Reclaimed~


Many curb-side “treasures” have made their way into our garage over the past 20 years.  I just can’t seem to help myself.  When I see items that I know I can use, someone else can use or that I feel I can recycle into something useful for our home, I “snag” them.  While most of my finds have been put to good use, some have been tossed back to the curb when I have not done anything with them after a certain period of time.  I had a little regret after pitching some nicely weathered blue louvered shutters recently. I vowed that next time shutters came my way, I would make sure I held onto them.  Not long after getting rid of my blue shutters, I scored with four brown paneled ones.  With a nice flat surface, I knew they would be great for painting.


With the idea of painting a flag, I choose two shutters for my project.


Before getting started, I gave the shutters a good cleaning. 


I used some recycled hardware to connect my two shutters together.


The fun begins:

I first began by drawing off lines for the stripes.  I have started too many projects where I thought I could just “eye-ball” it and came up with some lines that were much wider than others.  I didn’t want to chance it, knowing that I needed to have exactly thirteen stripes. 


13 stripes for our 13 original colonies.


The red represents valor and bloodshed while white represents courage and purity.


The block of blue symbolizes our freedom. 

 Praise be to God for all the men and women who have fought, and continue to fight, for 
what we often times take for granted in our country!


With only the stars to go, I decided to sand the surface a bit to give my flag an aged patina.  I thought that using my Makita electric sander would  be a good idea.  I would just hit it quickly and lightly and be done. 


-BUT-


The bits of old paint that gave my shutters the character that I so admired, proved to be too much for my sand paper.


I traded the electric sander for my sanding sponge.  If you have never used one of these, you are missing out on a very valuable tool.  I discovered these little jewels when I first began refinishing furniture.  


They are pliable so they will conform to whatever contour you are sanding (perfect for tables and chairs that have spindled legs).


I sanded the entire surface.


With a damp rag, I removed the sanding residue.


I had to go over it several times, rinsing my rag out in between.


Next I added 50 stars in recognition of our 50 beautiful states.


I sprayed a light coat of clear matte acrylic to seal the surface.


I hung my flag on the patio last night.  
Just in time for the Fourth of July!


The brave men and women who fight for our freedom know that “the more they give, the more they are"

                                                   -Frederick Buechner


Tuesday, June 25, 2013

20,000 Leagues...

I have had several folks ask me why I have not posted anything lately.  While I have not posted any recent projects, I have continued to write and post my "Thought for the Day” on a daily basis. Do I get a little credit for that?

All I can say is, "kudos to those bloggers who manage to post with regularity”.  Even with my children grown, I am finding that it is difficult to do.  Life gets in the way, I guess.  

It’s not that I have not been in a creative spirit, it’s just that I often get so excited about starting a creative venture, that stopping to photograph and write about it tends to break the “flow of things”.  After I pull out all of my materials (my toys, as I call them), I find that I am just so focused that I don’t want anything to break my momentum.  I hate to admit, but I tend to get a little irritated if the phone rings, even if it is a precious family member.  I need to work on that.

I did just finish a spread for my Altered Book Consortium’s round robbin.  The theme of this book is 20,000 Leagues Under the Sea.  Having just gotten back from a cruise on Saturday, I was excited to work on this one.


It may be hard to tell, but there are multiple layers involved with this one.

I first began by painting the background with acrylics, in sort of a wavy pattern, using various shades of blue and some yellow.

Next I added some images of sea plants that I cut out of scrapbook paper. I sprinkled some fine glitter on top of them which adhered to the edges of my images where some glue had “leaked out”.


*Aleene’s Original Tacky Glue was the only adhesive that I used on this page.

I then glued on some, what I will call, leaf skeletons.

To create depth in the depth blue sea, I glued on some “waves” that I cut from plastic gift wrap.

For the next layer, I added some flowers.  I put some foam circles behind my flowers before gluing them down to give added dimension.

Lastly, I added some netting, the mermaid and the words.

The mermaid is a cardstock image that I found on a calendar and her body is fabric.  I also used foam circles behind the mermaid so that she “floated” on the page.

I have only been back from vacation for 3 days now and I already want to get back out on the water!


For now, I will just have to relive my days at sea while I work on my travel journal from the cruise.


“Look at that sea, girls--all silver and shadow and vision of things not seen. We couldn't enjoy its loveliness any more if we had millions of dollars and ropes of diamonds.” 
― L.M. Montgomery, Anne of Green Gables


Tuesday, April 9, 2013


 Paper Towel Art Dolls~


 We are finding so many ways to create art in the Community Art Room with stuff that most folks would throw away.  The latest craze has been our paper towel art dolls.  Actually, most of the people are enjoying using toilet paper rolls. By using both paper towel rolls and toilet paper rolls together, you could create a whole family!

I made this art doll for my husband for Valentine’s Day. Not to worry,I got him something else as well. Dolls are "not his thing”, but he is so used to my altered art, that he accepted it with a smile.  

*The hollow base of the dolls would be a great place to conceal a gift certificate.


Prior to learning about these art dolls, my cardboard rolls always went into my compost bin, but very few are making it there these days!


Materials:
-Paper towel or toilet paper roll
-wire or embroidery floss and needle
-acrylic paints
-graphics for face (magazine pictures work well)
-any accent pieces to embellish your doll
-glue (school or craft)


The first step in making an art doll is to pinch together one end of the roll and cut out a circle to form a “head”.
  
Second step-Using a piece of cardboard for you working surface, pierce holes through the front and back along the “shoulders” and “head” area.  

Third step-Sew” front to back along shoulder and head area using either wire or embroidery floss.

Fourth Step-Paint your doll with acrylic paint. 

Fifth Step-Add a face to your doll and any accent pieces.


WARNING:  These little dolls can be habit forming!


Friday, March 22, 2013


God Bless you!


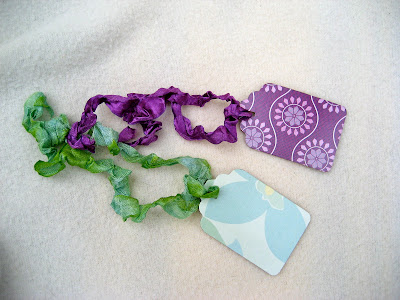
“God bless you”.  You may say this when someone sneezes.  I am  going to show you how you can recycle your empty Kleenex box so that your blessings can continue.  


These boxes come in such a wonderful array of colors and patterns:


After breaking down my tissue boxes for recycling one day, I thought that there must be some way that I could reuse them instead of just sending them straight to the recycling center.  


Gift tags were the first thing that came to my mind, so I got out one of my tag punches,  


then I began cutting away any flaps and such that I would not be able to use.  Have no fear, these pieces went into the recycling bin.


The card board used for these boxes are typically of a heavier weight. You will want to do your punching on a solid surface so that you can put some “power behind your punch”.  You should get a nice clean cut.


With proper placement of your punch, you should be able to get roughy 6-8 tags out of one box.


I punched a hole in the tag so that I could attach a ribbon to it. The hole punch I used was a rectangle one.


Now, with a color coordinated ribbon, my tags are ready to be placed on a package.
These colors are perfect for spring. They would be great for an Easter or Mother’s Day gift!


Tuesday, February 26, 2013

a little art in your life~

So many projects, so little time...  It seems that I am always beginning a project.  After all, they say that starting  a new project is one of the greatest joys and desires of an artist or craftsman.  It’s that initial step into a new set of thoughts, images and supplies that is so appealing.  It’s sort of a “high” for some of us.  Thank goodness for deadlines, because, without them, I might not ever finish anything!

In the past few months, I have been working diligently on various ventures.  None of any large magnitude really,  just things for the hospital, my art groups, gifts for folks and a few failed attempts at  new techniques.  I often get so excited to begin something new, that I get “lost “ in my process.  But after all, that’s what art is all about anyway, right? Just putting aside “real life” in order to be able to be creative.  It’s very cathartic for me and is much cheaper than therapy!  I get so engrossed in what I am doing that capturing my journey on camera is the last thing on my mind.  Sometimes it almost seems to “spoil the moment” because, instead of “loosing myself” in my work, I get caught up in the mechanics.  When I try to get “back in track”, the rhythm of the flow of my work is lost.

All that goes to say that this is why I have not posted any projects lately.  It’s not that my muse has been on hiatus,  on the contrary.  I just have not recorded much in the way of pictures.

A dear friend of mine, Cindy, who is a very talented artist, has been trying to get me to do some altered art on Rolodex cards.  It has actually been a few years now.  I got excited about the notion, and immediately set out to find a Rolodex card “system”.  It was a difficult task as many of us have become dependent upon our cell phones and the internet for phone numbers.  These card catalogues have become virtually dinosaurs-most extinct.  Since the “thrill of the hunt” is so strong in me, I was determined not to give up on my search.  After months, of hitting yard sales and thrift stores, I secured two of these treasures.  I felt as thought I had really accomplished something!  It seemed, instead a means to an end, it was an end in itself, because I didn’t even attempt a card until just a few weeks ago.  What was my stumbling block?  I used excuses like:" I have the cards now and can work on them whenever" or "my work will never be as good as my friend’s, so why try?”.  Her cards are very stunning!  They truly are miniature works of art.  

I have heard the term “perfectionist procrastinator” as being what often prevents us from starting something new.  It’s that fear that my first step won’t be “good enough” so why even start.  I am learning, after suffering for some time under this negative label, that that is pure foolishness!   You can’t experience the blessing that being creative brings until you begin.  We deprive ourselves of great joy when we worry about what we are doing or what the outcome will look like.

On order to “jumpstart" me on the Rolodex cards, my friend included me in an artist challenge.  Here are my first two attempts at these tiny bits of art:


So, with two under my belt, I can say that I now understand her intrigue with these little cards.  She challenged herself to make something like 100 of them.  They were all gorgeous! 

 The beauty of these is that is doesn’t require much material at all.  They can be made from the smallest little scraps sitting at your workspace.  As I add more to my file, I can see how these finished bits of art will be a source of inspiration for me.  

If you can’t locate a Rolodex, just use an old fashioned index file.  If you can find used index cards to do your art on, all the better.  There is such beauty in layering!